My Zones
Main page: Configuration
Previous: Weather & Location
Next: When to Water
Specify one or more irrigation zones here. The integration calculates irrigation duration per zone, depending on size, throughput, state, module and sensor group. A zone can be:
- disabled: The zone is then not calculated and duration will be set to 0.
- automatic: The zones duration is automatically calculated.
- manual: You can specify the zones duration yourself.
When entering any values in the configuration of this integration, take notice of the labels provided so you enter values in the correct units.
Where zones live: dashboard vs. settings
Zones appear in two places:
- The top-level Zones tab is the everyday dashboard. Each zone card shows an at-a-glance verdict (e.g. "Watering needed: ~6 min", "No watering needed" or "Turned off"), a one-line status (bucket and when it was last checked), and the operational buttons Update, Calculate and Irrigate now. A gear icon on each card opens that zone's settings.
- Setup → My Zones is where you add, configure and delete zones, and view each zone's calculation explanation. (Weather records, the forecast and the watering calendar are no longer per-zone — they live once on the Weather & Location tab.) The sections below ("Adding a zone", "Configuring a zone") all live here.
Multi-zone support
For irrigation systems that have multiple zones which you want to run in series or independent you need to create multiple zones. The configuration should be done for each zone, including the area the zone covers and the corresponding settings.
Adding a zone
Zones are added and configured under Setup → My Zones. Click the + button and provide:
- Name: The name of your zone, e.g. 'garden'
- Size: The size of this zone (m2 or sq ft)
- Throughput: The flow of this zone (liter/minute or gallon/minute)
After clicking Add, the new zone appears in the list (and as a device with entities in Home Assistant), with its settings shown directly underneath so you can finish configuring it.
Actions on all automatic Zones
These bulk actions are split across the two surfaces:
- Refresh weather data / Recalculate durations / Water all zones now — on the Zones dashboard (top tab): collect weather data for, recalculate the duration of, or immediately irrigate every automatic zone.
- Reset all buckets / Clear all weather data — under Setup → My Zones → Bulk Actions: reset every automatic zone's bucket to
0, or remove all collected weather data for the sensor groups in use. Both ask for confirmation first.
Configuring a zone
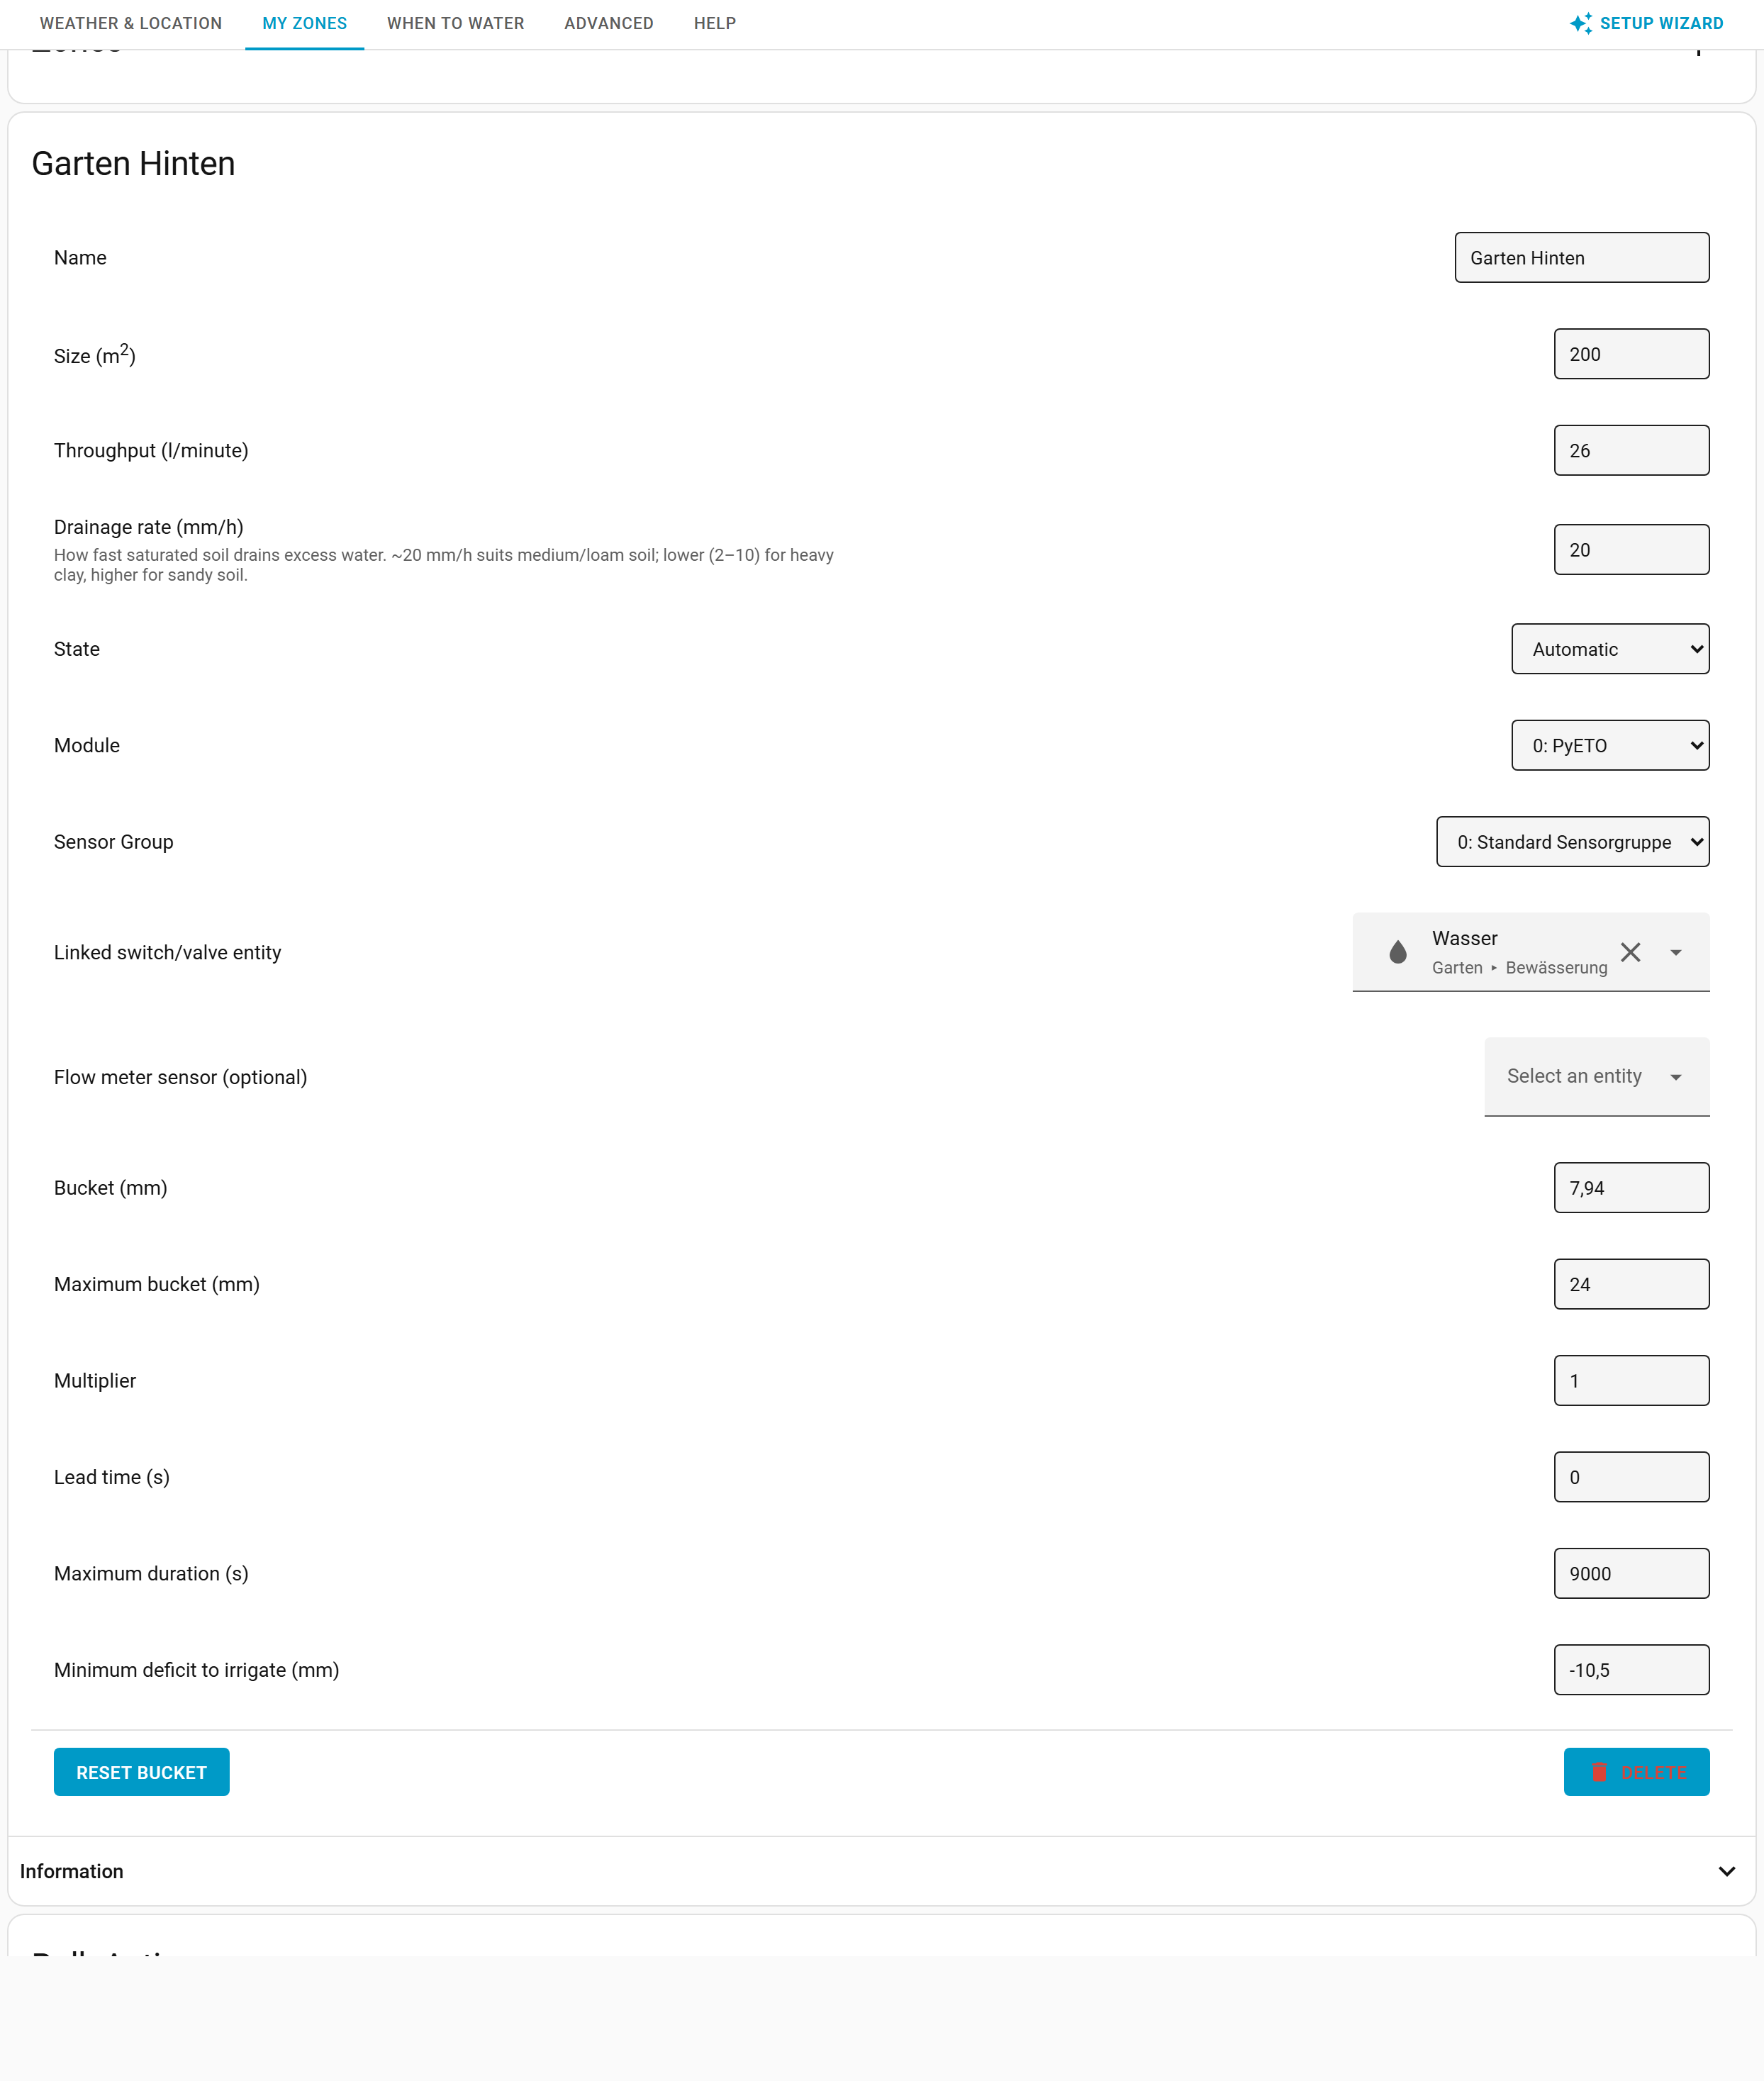
Open Setup → My Zones. Each zone's settings are shown directly under its name (no need to expand anything), and you can change:
-
Name: change the name of a zone
-
Size: change the size of a zone
-
Throughput: change the throughput of a zone
-
Drainage rate: set the drainage rate of a zone (mm/h or in/h). This is only applied when the bucket is above 0 (i.e. there is surplus moisture above field capacity). The full drainage rate only takes effect when the bucket is at its maximum value; below that it is applied as a fraction of the rate, following the hydraulic conductivity method of Brooks and Corey, Eq. 4-6. New zones default to 20 mm/h (a reasonable medium/loam soil value); existing zones keep whatever value they were created with. The right value depends heavily on your soil type — values quoted online (around 50.8 mm / 2 inch per hour) assume fully saturated soil and won't apply to most setups. Too low and a drainage problem isn't solved; too high and evapotranspiration has little impact. If you have drainage problems, adjust by ~5 mm/h every 24 hours until your area waters well without puddles forming.
-
Soil type: a shortcut shown just above the drainage-rate field. Pick a soil type — Sandy (35 mm/h, fast draining), Loam (20 mm/h, balanced), Silt (10 mm/h, slow draining) or Clay (5 mm/h, very slow draining) — to fill in a typical drainage rate instead of finding it by trial and error. Choosing a type only sets the number; you can still fine-tune it afterwards (the dropdown then shows Custom).
-
State:
- Automatic: Automatic updating and calculation of that zone. module and sensor group is mandatory.
- Manual: Only manual updating and calculation of that zone. No module and sensor group is required.
- Disabled: The zone is disabled. No updating and calculation of that zone. Setting a module and sensor group on the zone is optional.
-
Module: Choose the calculation module that should be used to calculate irrigation for the zone.
-
Sensor group: Choose the sensor group that provides the weather data for this zone.
-
Watering mode: How the integration actuates the zone — Classic (opens and closes a linked entity itself with a software timer), Self-closing service (sends the run duration to a self-closing valve and lets the hardware close it), OpenSprinkler station (hands the run to an OpenSprinkler controller, which owns both the queue and the valve) or Batch / queue controller (hands the whole irrigation to a queue-based controller in a single call). See Watering mode below.
-
Linked switch/valve/helper entity: Optionally control a valve directly (used by the Classic watering mode; in OpenSprinkler station mode the same field names the station instead) — see Linked entity below.
-
Flow meter sensor (optional): A sensor reporting the zone's actual water flow. When set, irrigation can run until the measured volume is reached instead of relying purely on the calculated time.
-
Bucket: Either calculated or manually set. The zone needs irrigation when the bucket falls below its minimum deficit to irrigate (see below; a 10 mm deficit by default) — a bucket of 0 or above never needs watering. See automations for examples on how to use this value.
All four depth values on a zone — bucket, maximum bucket, drainage rate and minimum deficit — are stored in the units Home Assistant is configured for, so an imperial install stores and displays them in inches. The defaults are seeded per unit system. If you later switch Home Assistant's unit system, these values are converted for you so they keep their meaning — see Unit system responsiveness.
-
Maximum bucket: You can manually set a maximum bucket size which represents the soil's water holding capacity. The maximum recommended bucket size is based on the type of soil:
- clay soil: 30 mm (1.18")
- sandy soil: 12 mm (0.47"). This recommendation is based on the soil water holding capacity. See this discussion for more details.
-
Lead time: Time needed to warm up your irrigation system (in seconds), e.g. time to establish a connection, start a pump, build pressure, etc. After the duration is calculated, the lead time is added but only if the duration is > 0.
-
Maximum duration: The maximum duration of the irrigation, to avoid flooding, wasting water, etc.
-
Multiplier: Multiplies / divides the duration of the irrigation. For lawns, it is recommended to set the multiplier depending on your grass type (See this discussion for more details):
- Cool-reason grasses (such as fescue, bluegrass) should be set to
0.8 - Warm-season grasses (such as bermuda, zoysia) should be set to
0.7.
- Cool-reason grasses (such as fescue, bluegrass) should be set to
-
Plant type and Crop coefficient (Kc): The weather-based evapotranspiration the integration computes is reference ET — the demand of a well-watered grass surface (FAO-56 ET₀). Real plantings use a fraction or multiple of that, captured by the crop coefficient (Kc). Pick a Plant type preset to fill in a typical Kc (lawn 0.8, vegetables 1.0, flower bed 0.9, shrubs 0.5, trees 0.7, xeriscape 0.3), or choose Custom and enter Kc directly. Kc scales only the ET term of the daily balance —
delta = (Kc × ET₀) × interval + precipitation— so rainfall is never scaled. The default1.0reproduces the previous reference-ET behaviour exactly.- Why not a "seasonal multiplier"? ET₀ already follows the seasons because it is computed from live weather (temperature, sun, wind). Multiplying it again by a fixed monthly factor would double-count that seasonality. Kc is the physically correct lever: it adjusts for what the zone grows, not what time of year it is.
- Kc vs Multiplier: Kc adjusts the underlying water balance (the bucket and the live deficit), so it also affects the skip/needs-water decision. The Multiplier only stretches the final run duration. Use Kc to model the plants; reserve the Multiplier for system-level tuning. (For grass you can express the recommendation above as a
0.8/0.7Kc instead of a multiplier.)
-
Minimum deficit to irrigate: How large the moisture deficit must be before the zone is considered to need watering. It is stored as a 0-or-negative value in your unit system; new zones default to a 10 mm deficit, which is
-10on a metric install and-0.39on an imperial one. Set it to0to irrigate as soon as there is any deficit, or to a more negative value to water less often but more deeply. -
Duration: Irrigation duration in seconds. Either calculated or manually set (manual zones only).
Watering mode {#watering-mode}
Each zone chooses how the integration actuates it:
-
Classic (default) — the integration opens the linked entity and closes it itself with a software timer. Simple, but if Home Assistant restarts mid-run the valve stays open until HA comes back.
-
Self-closing service — the close is owned by the hardware, not by Home Assistant. Many valves run their own countdown: once they are told a run duration they shut off on their own after it elapses, with no further contact from HA. The integration only transmits the duration to such a valve (through a small
run_servicescript) — so even if HA restarts or crashes the instant a run starts, the valve still closes itself and continuous irrigation becomes impossible. Instead of a linked entity you pick a Run service (ascript.*, chosen from a dropdown) and set:- Duration field — the parameter the duration is passed under (defaults to
duration, which the shipped blueprints use). - Duration unit — seconds or minutes, matching what your hardware expects (many Zigbee/Tuya valves count in minutes).
- Stop service (optional) — closes the valve if you stop a run early (while HA is up).
- Confirm entity (optional) — the real valve/switch entity the run service drives (e.g. a
valveorswitch), not the script. It holds a steady on-state while watering, so the integration can verify the open against it — poll-only, it never re-actuates — and flag a problem plus skip the moisture credit if the valve never turns on. Leave it empty to treat the run as write-only and credit optimistically (the hardware owns the close). When in doubt, leave it empty: it only helps with an entity that reports its on-state reliably — a valve that reports late (e.g. a sleepy Zigbee valve) could read as off and wrongly skip the credit, so the zone would water again on the next run. Do not point it at the run script: a fire-and-forget script returns to off immediately and is not a valid state signal. - Latency margin (seconds, default 4, 0–30; only with a confirm entity) — how many seconds the valve may take after the end of its run to report that it closed. The integration waits this long for the confirm entity to report off before it settles the run without that report. Once off is reported (and holds for the 5 s debounce), the run is settled on the valve's own reports: its duration is the reported window between the valve's on and off states, and the margin is the tolerance that window may fall short of the planned duration and still count as a complete run. That tolerance covers a late on report as much as a late off one — an on report that lags the valve's actual opening shortens the reported window exactly like an early close would, so an entity whose on report routinely lags by more than the margin turns every normal run into a partial one instead of a complete one. A run whose close report never arrives is settled as complete at planned duration + 5 s + margin. Raise the margin for a valve that reports either edge late — and prefer the valve itself as the confirm entity over a flow sensor standing in for it, since a flow reading's ramp-up and sampling delay tend to lag both edges further behind the water than the valve's own state does.
- Duration field — the parameter the duration is passed under (defaults to
-
OpenSprinkler station — the run is handed to an OpenSprinkler controller, which owns both the queue and the valve. Instead of a run service, point the zone's linked entity at the station's enabled switch (
switch.<station>_station_enabled); the station index, its running sensor and the run and stop calls are all derived from that entity when a run starts, so a controller that was offline when you configured the zone still works later. The controller queues what it is given rather than running it straight away, so a zone may begin watering minutes or hours after the integration dispatched it. The run is therefore timed from the station's own running sensor rather than from the dispatch, and a run the controller drops — a controller-side rain delay, a water level of 0, a stop-all — is written off with its moisture credit reversed and a zone problem raised. Zone sequencing means something slightly different here, because whether two stations run at once is a per-station station group in the controller's own configuration, which Irrigation Plus can read but never sets. Under Sequential and Rotating the integration enforces the order itself, dispatching one station and holding the rest back until it finishes, so the setting means the same thing whatever the controller's groups say. Under Parallel it hands the controller every station at once and the controller's groups decide what actually runs together — stations sharing a group run one after another, separate groups run alongside each other, and group 255 runs alongside everything. That grouping, and the controller's station delay between consecutive stations, are what a finish at that time schedule works its start time back from; both need the OpenSprinkler integration at v2.0.0 or later and controller firmware 2.2.0(1) or later to be readable, and without them the schedule reserves time for the longer case instead.
Set the controller's water level to 100%. OpenSprinkler applies its own weather-based water level percentage to every run it is given. Irrigation Plus has already scaled the duration by its own calculation, so leaving the controller's adjustment on applies a weather correction twice and the zone is under-watered. Set the water level to 100%, or turn the controller's weather adjustment off. Master and pump control stays with the controller, which drives its own master station with its own on/off delays.
What counts as self-closing hardware? Anything that runs its own timer once told a duration — for example Zigbee2MQTT valves with a built-in countdown (Tuya
countdown_l1, SONOFFcyclic_timed_irrigation), or a DIY / ESPHome controller that closes its own valve after a received runtime. The script is only an adapter so the integration can drive all of them the same way — it is not what closes the valve. A plain switch with no hardware timer is not self-closing; use Classic mode for that.
To make self-closing setup painless, three script blueprints ship with the integration and are copied into config/blueprints/script/irrigation_plus/ automatically on setup (existing files are never overwritten):
| Blueprint | For | Duration unit |
|---|---|---|
| Tuya TS0601 dual water valve (Z2M) | Tuya TS0601_water_switch — countdown_l1 + state_l1 (custom converters may use valve_l1) |
Minutes |
| SONOFF Smart Water Valve SWV (Z2M) | SONOFF Zigbee Smart Water Valve (SWV) — cyclic_timed_irrigation |
Seconds |
| Self-closing valve (entity based) | ZHA / non-MQTT valves with a hardware countdown number entity |
match the entity |
Setup: create a script from the blueprint under Settings → Automations & Scenes → Blueprints (fill in your valve's MQTT topic or entities), then in the zone set Watering mode = Self-closing service and pick that script as the Run service. Each blueprint's script opens on duration > 0 and closes on duration = 0, so the same script also works as the Stop service.
Blueprints only cover common cases. Any script that accepts a
durationfield works — the device specifics live in the script, so the same mechanism drives Z2M, ZHA, ESPHome or anything else.
-
Batch / queue controller — the whole irrigation is handed over in a single service call, as an ordered list of zones and durations, and the controller runs that list from its own queue. Where Self-closing service sends one call per zone and OpenSprinkler station talks to one specific product, this mode is for any controller that can accept a plan and work through it — the ESPHome sprinkler component is the motivating example, but nothing about the mode is specific to it. It is described entirely in terms of what each entity you configure must mean, so ordinary Home Assistant helpers satisfy it just as well.
A queue waters one valve at a time, so batch zones are inherently sequential. Order comes from the order of the zone list, and the zone sequencing setting does not apply to them —
parallelsimply cannot be expressed in a queue. (A rotation is expressible in principle: list a zone more than once with a slice of its duration. The integration does not send one today.)Per zone you set only the valve switch, in the Confirm entity field. In the other modes that field is an optional extra check; here it is required, because it is the only thing that can start or end the run. The zone's water is timed from the moment that entity turns on — never from when the plan was sent — so a zone still waiting its turn in the queue is not credited with water it has not had yet, and a zone the controller never reaches is written off with its moisture credit reversed and a zone problem raised.
Everything else is configured once, under General settings → Batch dispatch:
Setting Required What it is Run service yes The script handed the plan. It receives one field, zones, holding an ordered list of{zone_id, zone_name, duration}.Stop service yes in practice The script that stops the irrigation and clears the queue. Paused indicator yes, if your controller can pause One entity per controller, on while the irrigation is paused. Without it a pause is indistinguishable from a stop — see Pausing. Pause timeout optional How long a pause may last before the run is settled for what it delivered. On pause timeout optional A script called when that timeout expires, so you decide what to do.
The stop service must also clear the queue. On a real controller, stopping one zone stops the whole cycle — but the queue survives it. Zones that were queued and never started stay queued, and will water on the next manual start, with Irrigation Plus having already closed its books on them. That is why the stop script has to do both, and why stopping any one batch zone settles every batch run in flight rather than pretending it is a per-zone action. The same applies when the integration is disabled or removed, or Home Assistant shuts down: each of those stops the controller and clears the queue too. On an ESPHome controller the script is
sprinkler.shutdownfollowed bysprinkler.clear_queued_valves.
Clear the queue at the start of the run script too. The stop path above is the one that matters for a cycle Irrigation Plus ended itself, but a queue can also survive something Irrigation Plus never saw — a cycle started by hand on the controller, or one left behind by a controller reboot. Making
clear_queued_valvesthe first action of the run script means every plan starts from a known state, and a leftover zone cannot run alongside the plan that was just handed over. The worked example below does this.
If your controller switches its own pump, do not configure a master switch here. ESPHome's sprinkler component has its own pump handling, which switches the pump along with the valves. A master switch configured in Irrigation Plus as well would give one pump two independent owners, each deciding when it runs — exactly the failure the master model exists to prevent. Use one or the other. (Note that the pump interaction is unverified in the field: the only person able to test this mode has no pump.)
Leave the controller's multiplier and repeat out. If your controller can scale run times or repeat a cycle, those would rescale durations Irrigation Plus has already calculated. They are optional in the ESPHome configuration — omit them, or set them to neutral values (multiplier 1, repeat 0). Irrigation Plus cannot detect them, so this is a precondition rather than something it can enforce.
Pausing {#batch-pause}
Some controllers can pause an irrigation: the valve switch turns off while the controller keeps the remaining time, ready to resume. Without being told about it, Irrigation Plus would read that as the controller cutting the run short — settling the run as partial, reversing the part of the moisture credit it believed had not been delivered, and then watching the controller resume a zone it had already closed the books on.
Without a paused indicator there is nothing to tell the two apart, and that is exactly what happens: the first pause settles the run, reverses part of the credit, and the zone reads as finished while the controller is still holding water for it. If your controller has a pause button, configure one.
Configure a paused indicator and that is handled: while it reads on, a valve going off is a pause rather than a finish, and the run simply stops accumulating watering time. The panel stops counting down too — a paused run shows its Stop control without a remaining time, because only the controller knows when it will hand the rest back. Run time in this mode is the sum of the watering segments rather than one stretch from the start, so a twenty-minute pause costs nothing — and because the total is persisted, a restart in the middle of a pause still adds up correctly.
An indicator that stops reporting — the usual case being a controller still reconnecting after a Home Assistant restart — counts as paused, not as stopped. Irrigation Plus never reads "cannot see the controller" as "the run ended", so a restart in the middle of a pause keeps the run and picks the water back up when the controller resumes.
A pause holds the whole queue, and the zones behind it keep their place. Irrigation Plus gives every queued zone a deadline by which its turn should have come, so a zone the controller silently drops does not sit claimed forever. That deadline is measured against time the controller spends watering, so it stops while the controller is paused and picks up with the time it had left when the cycle resumes — a long pause cannot write off the zones still waiting behind it. On the dashboard those zones read Queued…, distinct from the paused one, which reads Paused….
A pause is always bounded. Leave the pause timeout at 0 and a generous default backstop applies. This is deliberate: an unbounded pause is harmless to the controller, but a run that never ends holds its zone against any future run, holds the pump, and keeps a moisture credit for water that never fell — so the zone reads as watered while it is dry, and stays that way until someone notices. If you set an On pause timeout script it is called when the bound expires, so you decide what giving up means on your hardware (resume, shut down, clear the queue); the run is settled for what it actually delivered either way.
A worked example (ESPHome) {#batch-example}
The run script receives the plan and queues it. zones is a list, so it is walked with a repeat:
alias: Irrigation - run batch
mode: single
fields:
  zones:
    description: Ordered list of {zone_id, zone_name, duration} from Irrigation Plus.
    required: true
sequence:
  # Start from a known state, or a leftover queue would run alongside this plan.
  - action: esphome.sprinkler_clear_queued_valves
  - repeat:
      for_each: ""
      sequence:
        - action: esphome.sprinkler_queue_valve
          data:
            # Map the Irrigation Plus zone id to the controller's valve number.
            valve_number: ""
            run_duration: ""
  - action: esphome.sprinkler_start_from_queue
The stop script must do both halves:
alias: Irrigation - stop batch
mode: single
sequence:
  - action: esphome.sprinkler_shutdown
  - action: esphome.sprinkler_clear_queued_valves
The optional paused indicator, as an ESPHome template binary sensor:
binary_sensor:
  - platform: template
    name: "Controller paused"
    lambda: |-
      return id(sprinkler_controller).paused_valve().has_value();
Then, per zone: Watering mode = Batch / queue controller, and Confirm entity = that zone's valve switch (switch.<zone>_valve). Durations are sent in each zone's own Duration unit, so set that to whatever your controller expects.
None of this requires ESPHome. Any script that accepts a
zoneslist works, and the paused indicator can be aninput_booleanyour own automation sets. The mode describes what the entities must mean, not where they come from.
Linked entity {#linked-entity}
Optionally link a Home Assistant switch, valve or input_boolean (helper) entity to a zone (the Classic watering mode). When irrigation fires, the integration will:
- Call
turn_onon the entity - Wait for the calculated duration (in seconds)
- Call
turn_offon the entity
This means no automation is needed to control your valve — the integration does it directly. The zone sequencing setting on the When to Water tab controls whether multiple linked zones run in parallel or one after another.
OpenSprinkler stations are the exception. In OpenSprinkler station mode this field holds the station's enabled switch, and the integration never calls
turn_onon it — that switch rewrites the station's enabled flag in the controller's configuration and opens no valve. The run is sent as a station run instead, and the three steps above do not apply. A zone left in Classic mode with a station linked has its run refused rather than performed, so the station's configuration is never rewritten by accident.
Tip: Start typing
switch.,valve.orinput_boolean.in the field and all matching entities in your HA instance will appear as autocomplete suggestions. Linking aninput_booleanhelper is handy when you drive the actual valve from your own automation but still want Irrigation Plus to start/stop it.
If you prefer to keep using automations, simply leave this field empty and listen for the irrigation_plus_start_irrigation_all_zones event, which fires whenever an irrigate schedule runs.
Soil-moisture veto
Two optional per-zone fields let a soil-moisture sensor skip a zone that is already wet enough — without touching the ET calculation.
- Soil-moisture sensor — a sensor reporting this zone's soil moisture in percent (higher = wetter). Leave empty to disable the veto for the zone.
- Skip above soil moisture (%) — the wet threshold.
On an automatic (scheduled) run, if the sensor reads strictly above the threshold, HASI skips that zone and resets its bucket to 0 (re-anchoring the water balance to field capacity). Manual Irrigate Now runs always water. If the sensor is unavailable or non-numeric, the zone waters normally (fail-open) — a dead sensor never silently stops irrigation.
Each skip is recorded in the zone's run history ("Recent runs", persisted
across restarts) as a skipped entry, and also fires the
irrigation_plus_zone_skipped event for your own logging.
Why reset the bucket instead of carrying the deficit? The bucket is a signed water balance (negative = deficit). A measured-wet zone is at field capacity, i.e. no deficit — so the balance is re-anchored to 0. Carrying an old modeled deficit that the measurement contradicts would make the controller over-water to "catch up" once the veto lifts. This matches FAO-56 (root-zone depletion is bounded at 0 at field capacity), the Extension "checkbook" scheduling method (overwrite the book with the field measurement), and every model-based commercial controller (Rachio, RainMachine, Spruce all re-anchor toward field capacity on a wet signal).
Available actions per zone
On the Zones dashboard, each zone card shows an at-a-glance verdict, a one-line status (bucket and when it was last checked), and the everyday action buttons:
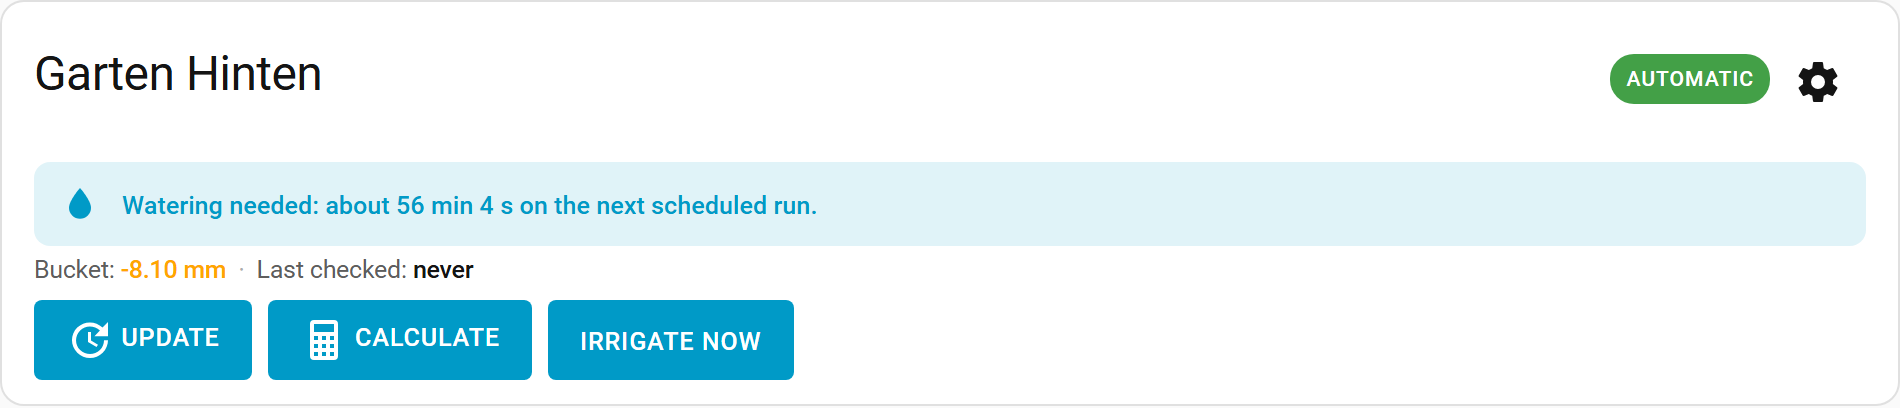
- Update — Collect weather data from the sensor group for the zone.
- Calculate — Recalculate the zone's irrigation duration. The zone consumes only the weather data it needs (the shared buffer is kept for other zones and pruned automatically).
- Irrigate Now — Immediately water the zone for its calculated duration (via the linked entity in Classic mode, or the Run service in self-closing mode), then stop. Bypasses all skip conditions. Available once the zone can actuate — a linked entity or a self-closing service — and shown disabled with a hint otherwise.
The remaining per-zone tools live under Setup → My Zones:
- Calculation explanation — Expand a zone's Information panel for a detailed breakdown of how the bucket was updated and how the lead time and multiplier affected the final duration.
- Delete — Remove the zone.
Weather records, the forecast and the 12-month seasonal outlook are no longer shown per zone — they apply to your whole location, so they now live once on the Weather & Location tab.
Main page: Configuration
Previous: Weather & Location
Next: When to Water